
IMPETUS – Interactive MultiPhysics Simulation Environment
Tutorials
Tutorial 0: Using the Tutorial
Tutorial 1: Creating a simple Molecular Dynamics Simulation
Tutorial 2: Solving the Diffusion equation using Interactive Field
Tutorial 3: Simple Chemotaxis Model
Full PDF tutorial is also available.
Download IMPETUS and Tutorials.
Tutorial 1: Creating a simple Molecular Dynamics Simulation
1.1 Introduction
Here, we provide instructions on how to create a simple Molecular Dynamics simulation. Users will be running (i) an NVE simulation of 8000 particles interacting via a simple spring potential, and (ii) a liquid simulation using the LJ potential. In addition, the tutorial provides instructions on how to record the mean square displacement and compute the radial distribution function.
· The files for these examples are located in:
Tutorials/tutorialSimpleMD/
· To include the header for a simple molecular dynamics simulations insert the following line in main.cpp
#include "../Tutorials/tutorialSimpleMD/simple.h"
1.2 The Parameters Object
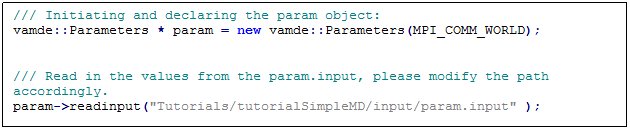
The C++ IMPETUS object "Parameters" is the core of the simulations. The purpose of the “Parameters” is to store all the parameter variables used in a simulation. All MIDs and many other functions will refer to the pointer of “Parameters” to obtain simulation variables. It can be constructed with or without using an input file. For the scope of this tutorial, we will construct it using an input file. The input argument for constructing a "Parameters" object is the MPI_Comm object, commonly named as the global variable: MPI_COMM_WORLD. For details, please refer to the online application program interface (API) http://engr.uconn.edu/~gelyko/impetus.html.
Some of the variables in the "Parameters" object are imperative to construct the simulation. Such mandatory parameters are:
· Processor division of the simulation. For example, to divide the simulation to 8 processes in a 2x2x2 partition, the user should assign the value of 2 to each of the following "Parameters" variables:
int gridinfo->proc.np[3]
· The user is required to assign the lower and upper coordinates of the total simulation box:
double gridinfo->world.lo[3]
double gridinfo->world.hi[3]
Some of the parameters are optional. However, the use is strongly encouraged to assign a value to them. These parameters are:
· Time scale:
double delta_t
· Number of steps for the simulation:
int end_step
The optional parameters that are required by some commonly used functions are:
· The desired temperature of the simulation which is required for thermostats:
double desired_temperature
· The atomeye cfg printing frequency for cell space, continuum space, and network space:
int cell_print_interval
int cont_print_interval
int net_print_interval
· The number of “GlobalNetwork”, “CellSpace”, “InteractiveField” that the user intend to use in the program:
int n_net
int n_cell
int n_cont
An example of how to create the “Parameters” object using an input file is as follows:
An example of param.input is as follows:
![Text Box: [IN] delta_t
0.01
[IN] end_step
1000
[IN] cell_print_interval
100
[IN] cont_print_interval
100
[IN] proc.np
2 2 2
[IN] world.lo
0 0 0
[IN] world.hi
20 20 20
[IN] desired_temperature
1
[IN] number of networks
0
[IN] number of cell list space
1
[IN] number of continuum space
0](tutword1_files/image002.gif)
Common “Parameters” Functions:
In addition, the “Parameters” object provides functions that are commonly used in simulations.
· Getting the rank number of current simulation process:
int rank()
· Getting the simulation time:
double time()
· Getting the simulation time step
int step()
· Advancing the simulation clock by one step
void clock->advance();
The “CellSpace” object is the short-range particle dynamic MID built using LCM (refer to Online Methods). It handles all particle dynamics functions. The “Parameters” object is required to create the “CellSpace”. An example on how to create the “Parameters” object using an input file is given below:

Mandatory parameters required for “CellSpace” to be constructed:
· The minimum_cell_size variable also referred to as rcut in the input file is the minimum size of a cell in the LCM. Note that the space is automatically divided up evenly to all cells so the resulting size of the cells will be at least as large as the provided minimum_cell_size.
double minimum_cell_size
· The variables “sigma” and “mass” represent the size and mass of the particles in the “CellSpace”, respectively. They are used in the molecular dynamics potentials which are provided with the library. However, they are not absolutely necessary if users plan to build their own potential functions:
double sigma;
double mass;
· Some functions, such as printing of cfg files requires the following output path variable:
char *output_directory_name;
“CellSpace” has functions that automatically generate simple initial configurations for particles but users can build their own initial configurations by using the “createParticle()” function. This is discussed in the online API:
· “CellSpace” automatically provides a uniformly distributed set of particles as an initial configuration. The following variables describe the distribution:
int particle_distribution[3];
· Users can assign two types of initial velocity distribution. Set “velocity_distribution_type” to 0 to assign the same initial velocity to all particles and to 1 to assign random uniformly distributed particle velocities ranging between a provided minimum and maximum value:
int velocity_distribution_type ;
· The 3 components of the constant initial velocity distribution are assigned to:
double orderly_velocity_distribution [3];
· The minimum and maximum value of the uniform velocity distribution are assigned to:
double uniformly_randomly_velocity_distribution_lower[3];
double uniformly_randomly_velocity_distribution_upper[3];
An example of cell0.input is as follows:
![Text Box: [IN] rcut
1.122462048309373
[IN] sigma
1
[IN] mass
1
[IN] particle distribution
20 20 20
% velocity distribution type: 0 for orderly, 1 for uniformly random.
[IN] velocity distribution type
0
[IN] orderly velocity distribution
0.3 0.3 0.3
[IN] uniformly randomly velocity distribution lower
-1 -1 -1
[IN] uniformly randomly velocity distribution upper
1 1 1
[IN] output directory name
Tutorials/tutorialSimpleMD/output/Cell_outputs/cell0/](tutword1_files/image004.gif)
Common "CellSpace" Functions
“CellSpace” provides a large number of functions for users to create simulations. The commonly used functions are the following:
· “moveParticles()” is used for moving particles across processors. Particles that are not within the simulation box of the current processor are moved to the neighbor processors.
void moveParticles();
· “move_particles_to_the_correct_cells()” is used to move particles to the correct cell in the cell list according to their positions within the same processor. This is recommend to use after integration and before moving particles across processors with “moveParticles()”
void move_particles_to_the_correct_cells();
· “copyParticles()” is used for copying particles that are on the borders of a processor to the shell layer of adjacent processors as pseudo particles for pair computations. This is required to perform pair-potential calculations.
void copyParticles();
· “deleteBorders()” is used to delete pseudo particles in shell layers. It is recommended to be used before performing “move_particles_to_the_correct_cells()” to avoid the deletions of particles that are moved to the shell layer in preparation for “moveParticles()”
void deleteBorders();
· “cfgwriter->print()” is used to print .cfg files for visualization. The files are printed to the provided output directory name. Please refer to the online API for complete instructions on how to visualize these files.
void cfgwriter->print();
1.4 Using Iteration Classes
The program provides a very organized way for users to implement potentials and functions as subclasses to one of the “iteration” base classes. Two examples are getPartList and getCellList. The users create function objects out of these classes. The input arguments for these objects are the pointers of the “CellSpace” of the particles that the user iterates. More “iteration” classes are available in IMPETUS.
The “getPartList” class is commonly used to program single action to particles. The “getCellList” is commonly used to program pair actions between particles and their neighbors in the cell list. The following is an example on how to use “getPartList” to set the force values of all particles to zero in preparation of new calculations. The actions are programmed in the function “action(Particle *i)”:
![Text Box: class ZeroForce1 : public getPartList {
public:
ZeroForce1(vamde::CellSpace *_s) : getPartList(_s) {}
void action(Particle *i) {
for (int d=0; d<DIM; d++) {
i->F[d] =0;
}
}
};](tutword1_files/image005.gif)
Examples on how to initiate and use the functions defined above:
ZeroForce1 zeroforce(s0);
zeroforce.apply();
Next, we show an example on how to use “getCellList” to create a simple spring potential between pairs of neighboring particles. The actions are programmed in “action(Particle *i, Particle *j)”. Note that users only need to modify i and not j, and the loop will provide both the i<->j interaction and the j<->i interaction:
![Text Box: class Spring1 : public getCellList {
public:
Spring1(vamde::CellSpace *_s) : getCellList(_s) {}
void action(Particle *i, Particle *j) {
real sigma = 1.0;
real epsilon = 5.0;
real r = 0.0;
for (int d=0; d<DIM; d++)
r += sqr(j->x[d] - i->x[d]);
real dx = sqrt(r);
if (dx <= 1.1) {
real f = epsilon * (dx - sigma) ;
for (int d=0; d<DIM; d++){
i->F[d] += f * (j->x[d] - i->x[d]) ;
}
}
}
};](tutword1_files/image006.gif)
Examples on how to initiate and use the functions defined above:
Spring1 spring(s0);
spring.apply();
The following example illustrates how to employ “getPartList” in order to implement a slightly more complex function. Here, we use the leapfrog algorithm. The “LeapFrog1” class can have its own variable and functions (e.g int PART , void step(int _step) ). Note that the “CellSpace” was constructed using “Parameters”, therefore users can call the “Parameters” object from “CellSpace”.
![Text Box: class LeapFrog1: public getPartList {
public:
LeapFrog1(vamde::CellSpace *_s) : getPartList(_s) {
PART = 0;
dt =_s->param-> delta_t;
}
void step(int _step){
PART = _step;
apply();
PART = 0;
}
private:
int PART;
double dt;
void action(Particle *i) {
for (int d=0; d<DIM; d++) {
if (PART == 1) {
i->v[d] = i->v[d] + (0.5* dt * i->F[d]/i->m);
i->x[d] = i->x[d] + ( dt * i->v[d] );
} else {
i->v[d] = i->v[d] + (0.5* dt * i->F[d]/i->m);
}
}
}
};](tutword1_files/image007.gif)
Examples on initiating and using these functions:
LeapFrog1 leapfrog(s0);
leapfrog.step(1);
leapfrog.step(2);
1.5 Creating a Simple Molecular Dynamics Simulation
By combining what we discussed up to this point in this tutorial, we can build simple molecular dynamics simulations using the provided library:
1.5.1 Visualization with Atomeye
To view particle configurations, we use the visualizer Atomeye. We provide functions to print out the particle coordinate files. In addition, we also provide methods to convert these files to configuration files for the Atomeye. For more information, please visit http://li.mit.edu/Archive/Graphics/A/ .
· The coordinates of the particles are saved in the “output_directory_name” variable that is assigned to the “CellSpace” object. For example,
[IN] output directory name
Tutorials/tutorialSimpleMD/output/Cell_outputs/cell0/
· To generate the configuration file, go to the directory input above and run the provided .m executable script to convert the output coordinate files to Atomeye format. Users have the option to run the script in Octave, FreeMat, or Matlab. The name of the script is:
mergeCellCfgOctave2016.m
· The converted file is saved in the folder named Cfg/
Note that users can use the provided class template for coordinate printing to create their own functions to print out files for other visualizers. User can also write their own scripts to convert the coordinate files to the appropriate format of their visualizer.
1.5.2 Building a Lennard-Jones (LJ) Liquid Model
This tutorial demonstrates how to build the LJ liquid simulation.
· Include the header for the simple molecular dynamics simulation by putting this line in main.cpp
#include "../Tutorials/tutorialSimpleMD/liquid.h"
· Note that the main difference between the liquid simulation and the simple molecular dynamics simulation discussed above is the use of the LJ potential instead of the spring potential. LJ potential (expression) is declared as follows:
LennardJones1 lennardjones(s0);
· The LJ function provided in this tutorial allows users to apply, by default, the entire LJ potential or only the repulsive part. When the repulsive LJ potential is implemented, make sure that the rcut in the input file is at least 1.12246 and then use the following function:
“lennardjones.setRepulsive()”
· To apply the pair potential to all close-range particles in s0, set the rcut to at least 2.5 and apply the following function:
“lennardjones.setAttractive()”;
· To use LJ, insert the following:
“lennardjones.apply()”;
In addition, here we discuss two postprocessing functions: the measurement of (i) the radial distribution function (RDF) and (ii) the mean square displacement (MSD) distribution (Supplementary Note 1). For RDF, build the “CellSpace” with an rcut of 4.0. The codes for MSD and RDF are not discussed in the Supplementary Information document but are provided in the online tutorial file. To construct and use of the functions insert:
MSD1 msd(s0);
msd.print();
RDF1 rdf(s0);
rdf.print();
For this tutorial, the files are saved in:
Tutorials/tutorialSimpleMD/output/MSD/
Tutorials/tutorialSimpleMD/output/RDF/
The user can view the plots using the provided .m Octave executable function in
Tutorials/tutorialSimpleMD/output/plotMSDandRDF.m
Results for a very similar simulation but in NVT ensemble is shown in EXAMPLES.